Pages

Friday, February 5, 2016

The Process for Creating a Silky Smooth Finish

I show each completed project on my Facebook page, but I don't always write a blog post about each piece.  I finished a vintage Kent Coffey Dresser yesterday, and a lovely lady asked what my process was to get such smooth silky finishes.  I thought an article on my process might be helpful to her and maybe others, too....so here it is:

I start with a quality piece that is in need of some RPK Love...


After assessing any necessary repairs, the prep work begins.  In this case, all of drawers worked well, and there was no veneer damage.  This yellow finish was popular in the early 60s, and experience has taught me that I can strip the top and find some lovely wood, but there is something the manufacturers used in the paint that prevents the stain from blending evenly.  In other words, this top was getting painted and not stripped and stained!

The hardware comes off and the sanding begins.  I know most folks feel like you don't need to sand when you use Annie Sloan Chalk Paint.  However, I prefer to sand to scuff up the finish and it also familiarizes me with the piece, noticing extra grime, or anything else that might be noteworthy.  After the sanding, every piece gets a good scrubbing with warm soapy water.  That removes any residual dust or oils, grease, etc.  

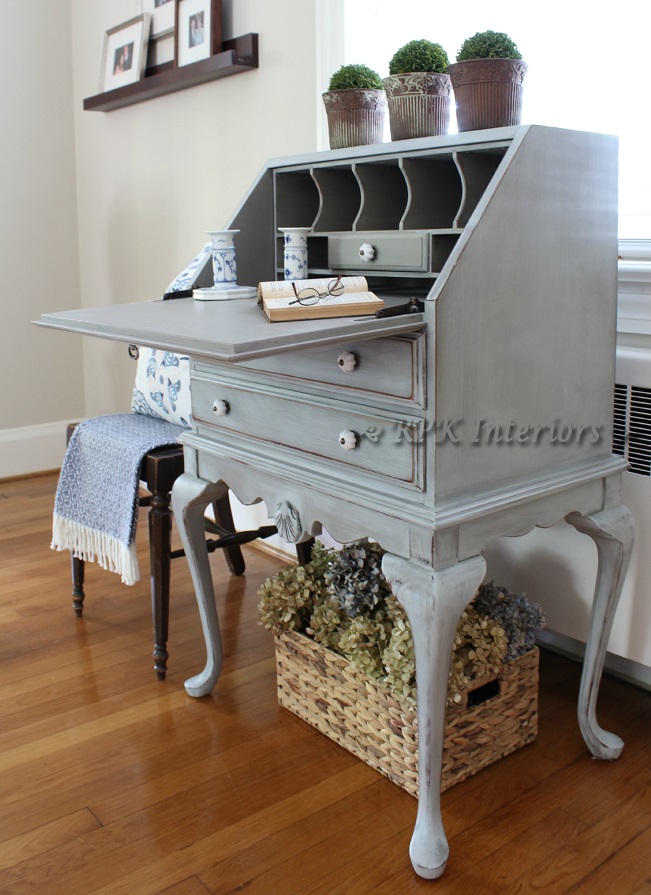
For this piece, I used a custom mix of ASCP Paris Gray and Duck Egg Blue.  My base coat was Coco.  


The first coat of Coco goes on, dries and then gets a good sanding of 220 grit sand paper.  The second coat of the custom mix goes on, and another sanding of 220 grit.  If I've achieved the level of coverage for the project, then a third coat goes on that is slightly watered down.  I prefer to dip my brush into water and then into the paint.  At this stage it should glide on easily.  After it's dried, it's another sanding of 220.


I wanted to add a subtle variation to the finish, so I mixed some Coco with Old White and created a wash to lay over the Duck Egg/Paris Gray.  Again, after the wash has dried, it gets another sanding of 220.  Are you sensing a pattern here?  Paint, sand, paint, sand, etc.

Then the top coat....General Finishes High Performance Top Coat in Flat....One coat, then guess what?  Sand with 220, then a second coat, sand and for the top I add a third coat.

I had a local DIYer ask me once how I get my finishes so hard and smooth....I told her I do a lot of sanding and her reply was "Oh I don't like to sand so I'll just skip those steps!"  Ok....whatever...I find this is a very tactile job...I am constantly running my hands over the pieces making sure the finishes are even and silky smooth.

That's the process I use.  If you have any other hints, tips or tricks, please share! 

Would you like to see a few more pictures?  I am so pleased with how this lovely gal turned out!


And by the way, each drawer gets a lot of my attention.  I am amazed when I see pieces offered on line or at vintage markets, how there is paint dripped on the sides of the drawers, and the interior of the drawers still have dust, spills, paper clips or hair pins remaining.  Really?  Whatever...I'm just saying.....


That's all she wrote....Sand, sand, sand, and then sand!  Ha! It sounds like I just might have the beach on my mind!  Warmer weather is just around the corner ( I hope!)!

As always, thanks for stopping by!


Friday, January 8, 2016

Creating Patina on this French Buffet

Everyday, my Facebook feed is filled with gorgeous images of French antiques, aged over time with lovely worn patinas.  When I acquired this very dated and tired looking buffet, I thought it was time to recreate the finishes I've admired for so long...


She had the structure and design that was practical for today's living, but that orange finish from the 50s needed to go!

I had some ideas on how I'd tackle this project, but it took some trial and error to the finish I was looking for.

Unfortunately, I didn't take any pictures of my ongoing process, so I'll show you pictures of the finished product and explain my process with each pic...

I knew I wanted to remove the handles on the doors, and apply a shabby applique I got from DoItYourselfChic.


And I thought some additional detail on the outside corners would be a nice touch...


I knew I wanted a refinished top....but didn't want my usual Dark Walnut finish....I wanted it to look natural.  So I stripped it completely and nurtured the wood with a combination of Dark Wax and Hemp Oil.


Now, let's get to the crackled finish!  I started with a rough, thick coat of ASCP French Linen.  Slop it on, folks!  Texture is important!


Next I applied Easy Crackle. I let it dry and then mixed some Paris Gray and Pure White for the top coat.  


After the FP/PW coat has dried, you can see the most beautiful crackling, patina developing.  It's like magic!  Some light sanding to get the roughness out...then applied clear and dark wax.


I just love how the dark wax settles into the details!


Here she is in all her glory!


On another note, I live in Southeast Virginia and our nearest Annie Sloan Stockist is 45 minutes away.  When I first started painting, I read a lot of tutorials about products, techniques, etc.  It's at that stage when I discovered Trish at The Purple Painted Lady.  Her shipping rates are so reasonable and if I order something on Tuesday, UPS gets it to me on Thursday.  Her tutorials and information on her website are so informative.  I get all of my Annie Sloan and MissMustardseed products from her...And in case you are wondering, I have not been compensated for these comments.  I love dealing with The Purple Painted Lady and thought a shout out was in order!

Thank you so much for stopping by!  I hope sharing my experience with this technique will help you discover some new way to 'breathe new life into old treasures'!

If you like what you see here, you may want to consider following me on Facebook.  I don't always write blog posts on my reloves, but I do post every piece I transform on FB.  If you see something you like and have questions, please feel free to reach out to me..I'm always happy to help!

Robin

Linking up at:


Sunday, December 27, 2015

What kept me away for a good portion of 2015....

Was moving from our home of 16 years into a "New" home, built in 1972.  It's a lovely center hall Colonial and all 3 bathrooms are in need of an update.  After long consideration, we decided one bathroom would get a complete overhaul, down to the studs.  The other two will get some cosmetic updates over time.  I'll make sure to share those transformations with you once they are completed, but for now, this post is about Our Harvest Gold Bathroom.


Yep....1970s!


This was a 1970s bathroom, if I've ever seen one.  It had to go!  Here's a simple, but effective graph of the existing layout:


I'm an old fashioned gal and rely on the paper grid sheets we used back in our geometry days!  Ha!  They work for me.  As a side note, before we moved in to the new house, I had a floor grid for every room, with accurate measurements and to scale cut outs of every piece of furniture.  So when the movers were here, we referred to "the room grid" to let them know where every piece was to be placed.  We ended up making a few tweaks in furniture placement, but it really helped the day of the move be less chaotic and very organised!

Meanwhile, back to the bathroom:  the layout was fine, so we didn't have to move any plumbing. The existing vanity was 43" wide, so I picked a 36" wide vanity to replace it.  It's amazing how much more spacious the bathroom feels by using a smaller vanity!  We still have plenty of storage in the cabinet.  Design is often times about creating illusions!

 Since my hubby and I are not handy, we hired a contractor to help us with this project. Harry from K&H Cabinet took on the task of helping us with this bathroom.  I've known Harry for most of my life.  As a matter of fact, his father built a home for my parents in 1959!  I hope he doesn't regret taking on this project...as it took him a few days to gut it, and 6 weeks to rebuild it!  Of course I was sweet and precious throughout the entire time!  (cough, cough)  It's hard having workers in your home everyday...you know?

This new bathroom, along with lots of packing and unpacking, dealing with trades people (we needed a new electric panel box, new boiler, lots of painting....blah, blah, blah) is what's kept me away from my RPK Reloves.

Do you want to see what my vision was for Mr Harvest Gold Bathroom?


I love the look of a frameless shower.  It makes this small guest bath look so much larger!  Take a look at where the shower door swings open.  It misses the front of the toilet by about 2".  This part of the layout was almost a big mistake on my part!  I had originally purchased a standard, elongated toilet, 31" from front to back.  After the shower was tiled in and the walls had new wall board, I started to look at the layout, taking more careful measurements and discovered we would not be able to have the shower door swing open, into the room, because it would hit the toilet.  I am not feeling too keen on my master plan!  I found another elongated toilet that was only 28" from front to back (and quite a bit more expensive, but that goes without saying!). I think the problem is solved...but it's not...

The next thing for me to worry about was the width of the shower door.  24" is the standard width of a frameless shower door. The primary user of the bathroom is 6'3", 200lbs.  Would he be able to ease in an out of a standard 24" door?  I don't think so....Maybe we have to use sliding doors?  Ug! When the shower guys came to measure and brainstorm with me, the space was such that we were able to get a custom 26" door.  Yay!  When the door swings open it misses the toilet by 2"!  

So the moral of this story is measure twice, and maybe even thrice.  The success of this small bathroom came down to inches and paying attention to those details!

 I was concerned with water spots on the glass.  I'm not a squeegee kind of gal and wasn't sure how we'd keep the glass sparkling.  Our contractor told me about RainX.  I cleaned the glass well, sprayed the RainX on the glass, wiped and buffed it off, and there are no water spots on the glass after a shower. The water beads up, and once it's evaporated there are no water marks!  Love it!


I've been using Houzz and Pinterest to help collect ideas for my vision.  I was drawn to the basket weave marble, surrounded by 12x12 marble.  I'm thrilled with it!  The basket weave is from Lowes and the 12x12 marble on the perimeter is from Home Depot.  No fancy tile stores for me....

The cabinet and Carrara Marble top are from Amazon.  I was a little nervous about ordering a piece like that online, but the customer reviews helped give me the confidence to go for it!  I'm glad I did....


The wall sconces are from Joss and Main and the mirror is from Target.


The 9x12 wall tile is from Lowes...and the 1" marble hex floor tile is from Home Depot.


The Delta faucet is from Lowes.


I didn't get a good picture of the wood paneled door, but it's solid and was a deep, mahogany color.  I decided not to paint over it....I love the wood with the white marble.  The door needed some nourishment though, as it had been neglected for 40 years.  MissMustardseed's hemp oil brought it back to life...with a beautiful, warm luster.

I learned from watching Sarah Richardson for many years that you can create a lovely design without breaking the bank when you shop at the big box stores. I tried to design a lovely bathroom, with a high end look, but wanted to keep the expenses within reason.  The big box stores have gorgeous products at affordable prices.  If you are in the market for a home improvement project, give them a try....

So that's why I've been away!  Hopefully, I'll get back to posting about some of my furniture reloves!

In the meantime, I hope you had a wonderful 2015!  Warm wishes for a happy, healthy and prosperous 2016!

xoxo
Robin


Sunday, November 22, 2015

A Gorgeous Pink Campaign Styled Dresser

It's been awhile since I've shared a post here.  Life has taken me away from my blog (we sold and bought a new home!), but hopefully I'll get back into the groove of sharing some reloves!

A good friend found this campaign styled dresser and asked if I would paint it for her....


I agreed to paint it on one condition:  She was to take the hardware off!  She agreed and so began the process.  She wanted a pink and after having fun mixing different paints, we decided a 50/50 mix of General Finishes Holiday Red: Snow White was the perfect color!  

My first step was to test all of the drawers to make sure they moved in and out easily.  A few needed some sanding, but for the most part they were in good condition.  I finished the prep (sanding, cleaning, filling gauges with wood filler, etc) and then restored the hardware to it's former glory!


Several coats of the custom color, along with lots of sanding in between coats...and then several more coats of General Finishes High Performance Gloss to complete the project!


I just completed a gorgeous night stand in Lamp Black, and thought both pieces together looked so glamorous!


I had so much fun staging this piece.  My friend has some amazing art that she brought over for the 'photo shoot'!  


The original brass hardware cleaned up beautifully and looks stunning against the vibrant pink!


The dresser made it to it's new home and I love how Tamy has accessorized it....very Palm Beach style with the two black laquered Chinese Chippendale chairs!  Ooohlala!


Thanks for stopping by!

Linking up at:


Wednesday, July 22, 2015

Vintage French Server using MMS Ironstone Milk Paint

Oh my goodness...this piece took my breath away when it came into my life!


It was made by Hickory Furniture and was from the 1950s!  My friends knew it would work perfectly in their very shabby beach house in the Outer Banks.  They wanted a stained top, and shabby base....


I choose MissMustardseed's Ironstone Milk Paint for this project.  I've never really used this paint before, and if definitely takes some getting used to.....But it was the PERFECT choice!  I loved how it chipped and sanded so smoothly!  


After stripping the top, the color of the wood was so gorgeous, it didn't need to be stained.  Two coats of Hemp Oil and then a light coat of wax.....


I staged this for a bathroom or guest area....Just something a little different than it's traditional use as a dining room server....


So pretty....Look at the original hardware...and check out the brass caps and wheels at the bottom of each leg!  Sigh.....


I'll definitely use MMS Milk Paints again! If you have a vintage piece that is begging for a shabby look, I'd suggest giving it a try!  Don't be afraid (as I was!).

Thanks for stopping by!

Monday, July 13, 2015

My Wells Secretary

When I had my first place (over 30 years ago) I had a lovely cherry secretary made by Wells Furniture in Roanoke, Va.  We carried the line in our family story and I admired the piece for a long time before it came to live with me.  It traveled with me to New Jersey in my first home with my hubby, and back down to Virginia, where it's been residing for the the past 22 years.  I didn't really have a good spot for it in our current house (only lived here 16 years!), so I finally decided to give it a relove.

Unfortunately I forgot to take a "Before" picture, but here are the completed transformation pictures:


I added the applique to the door that pulls down.  I thought it would add some visual interest.


Additionally, I replaced with 'bat wing' style pulls with these sweet white knobs from Hobby Lobby.


I used a base coat of French Linen and then blended Duck Egg and Paris Gray, with a smidge of Old White to create a mottled finish.

Since the base coat was French Linen, it seemed to be the logical color choice to paint the inside.


A little clear and dark wax, a good buffing...and she's all done!


I think she turned out beautifully!  It took me a long time to decide to 'relove' something from my personal stash, but it really did give this piece a new life...and it's since found a new home with a great couple!

I have a few more pieces in my personal stash that just are being neglected...Hopefully, this experience will inspire me to let go of the past, breathe some new life into them, and help find them new homes, where they'll be loved!

Thanks for stopping by!

Robin


Wednesday, May 20, 2015

ASCP Coco + Soft Washes

Laurie has been working on getting her bedroom designed and decorated for almost a year.  She's been so smart in her approach....Laying out a plan, and acquiring the 'right' pieces over time.  She had a lovely palette headboard made, and already had a standing chest when we first met.  She needed night stands and a dresser.  With some ace snooping skills from both of us, we found 2 different night stands, but after much discussion, we came up with an ASCP Coco base and a wash of gray and French Linen, with a smidge of dark glaze.  Although they were different styles, they were painted the same, giving a cohesive look to her design.


The hunt was on for a dresser.  Here it is May and we finally found one!  A few other candidates popped up over the past few months, but for various reasons, they didn't work out.  Although it can be disappointing to have something slip through your fingers, sometimes good things happen when you are patient!  Karma, baby, Karma!

As usual, I forgot to take the good old "Before" picture.  But after lots of brainstorming and a few sample drawers, we came up with the same them:  "Different but the same".  This time the Coco base was darkened slightly, and then washes added to the insets to give some definition to the lovely design of this Drexel dresser.


This piece is from the early 1960s...The Drexel Triune Collection.  The lovely Suzanne at The Painted Drawer had just completed the exact same dresser just weeks before I had the pleasure of scoring this one!  You can read about her transformation Here!  Her post even includes a "Before" picture if you are curious about what it looked like back in the day!  Anyway, I love these older pieces....especially when they include the coin and jewelry tray!  A little cleaning and sanding, along with MMS Hemp Oil brought it back to life!


And then of course the drawers...Could there ever be an RPK post without mentioning the drawers????


Laurie's room is almost done...She has a gorgeous French vanity that she inherited from her mother that I've been secretly coveting!  I hope she lets me give it some love one of these days!


I hope you enjoyed this makeover...and I hope Laurie does too!

Thanks for stopping by!