Pages

Thursday, March 20, 2014

Another Vintage Buffet

I do enjoy working on these vintage buffets.  I need to venture away from painting them black, but they look so handsome, especially when the top has been refinished in a warm, dark walnut stain.  This guy was no different....Strip the top, paint the base....and find him a loving home.


Well, he certainly had a mind of his own!  After stripping and sanding the top, there were some nasty marks that were giving me some 'conversation'!  Ha!  That was one of my father's favorite expressions when something or someone wasn't behaving correctly...."Don't give me any conversation".  Of course, those words were never directed at me, because, well you know...I was perfect in his eyes!  :)  Anyway, back to the task at hand...this top.  Check out those marks:


What is that mark from?  Looks like some kind of hot iron?  And if you look at the top of the picture, you can see some circular marks, most likely from water....

After several applications of Barkeepers Friend (thank you, Fiona for the tip), I started to see some improvement.


Pretty cool...eh?  The black iron marks are completely gone, but the circular water marks just aren't going to fully disappear.


Aren't they just darling???? Oh well, I'm several days into this now, and have decided it is time to start singing "You gotta know when to hold 'em, and when to fold 'em".  No stained top for this guy.


ASCP Graphite with some acrylic black added to darken it up.  I did use several coats of poly on the top for durability.


I spend a ton of time on the interiors of drawers...trying to restore them to their original beauty.  However, these drawers had some stains that weren't budging, so I chose to line them in a French Script style paper...


I have another similar buffet in my possession.  I'm going to try to fight the urge to paint it black...but no promises!  :)

Thank you for stopping by!

Robin

Linking Up At:


Thursday, March 13, 2014

Mixing Paint Colors

I enjoy working with Annie Sloan Chalk Paint.  I understand it and for the most part, I know what to expect from it.  However, and I am not sure why, I rarely use her colors straight out the can.  I'm always adding a little bit of this, or a little bit of that!  I don't understand what drives me to mix colors...because her colors are lovely, just the way they are.  Oh well...I mix colors, so let's get on with it.

I found a beautiful vintage chest, with the prettiest details.  It was in sad shape, with some veneer damage.  It had been stored in someone's basement for many years.  I apologize for not having any 'before' pictures.

We are in the midst of a long, cold winter, and I'm in the mood for a soft aqua. I pull out Provence, Duck Egg Blue and Old White.  I'm not quite ready for straight Provence....I think it is a very strong color...and if you look at my other projects, I tend to be very conservative with my color choices.  I had just completed a French chest in Duck Egg Blue and it really was so lovely.  Hmmm...let's start mixing and see what I come up with.


I love using white paper plates to play with colors.  It's not very fancy, but it works!  :)  As soon as I put the Duck Egg and Provence on the plate, I knew I would use some variation of Provence.  After adding Old White in different ratios, I've arrived at the color value, but it's too baby bluish.  Maybe a little Aubusson Blue will deepen it just a tad.  Oh look, I have a custom mix from a previous job that is comprised of Aubusson Blue and Old Ochre. 


Here's a picture of the chest done in this custom mix of Aubusson Blue & Old Ochre:


I drizzle a little of this darker mixture in to my Provence/Old White mixture and come up with a lovely aqua.

I know I want to have this piece feel layered, so my first coat is Old Ochre.  Then a few coats of my 'magic aqua', some distressing, clear and dark wax....


We find these pieces, we give them love...and this one has a custom color which makes it truly a one of a kind piece.

Thanks for stopping by!

Robin


Thursday, March 6, 2014

These Buffets are So Versatile

A vintage Drexel buffet with a custom glass top doesn't come along every day.  I held onto this piece for awhile before I started working on it.  It was from 1957 and in pretty good shape.

After much deliberation, my vision was coming clearer.  French Linen with new knobs.  I drilled some new holes for the knobs, and filled the other, unused holes.  I also wanted to try my hand at stenciling, and thought a Paris theme would be a lovely choice.


I stripped and sanded the top to reveal my favorite, flawless mahogany.  Yay!  You know the drill (if you read me regularly), Dark Walnut Stain and 4 coats of Polycrylic.  

The first coat (after shellac, to prevent bleed through) was a mixture of French Linen to Old White - 5:1.  The second coat was just the reverse:  Old White & French Linen - 5:1.  I love the look of a bit of layering....I feel it provides interest to the piece.


The knobs were from Hobby Lobby and added the perfect touch for my vision of this piece.


I never get tired of the beautiful warm tones of a refinished top.


The great thing about this piece is it can be used for so many things:  buffet, dresser, media storage, or foyer piece (if you happen to have an especially large foyer!).


As of yet, she hasn't been adopted, so she sits patiently adorning my dining room and I don't mind at all!

Thanks for stopping by!

Robin

Update:  This classic piece has found a loving home with Jessica and Bob. The funny thing is when Jessica opened the drawers and cabinet doors, she commented how the interior looked good and must not have been in bad shape.  What she didn't realize is that I put almost as much time into 'reloving' the interior, as I do the exterior.  Maybe I should start taking before and after pictures of the drawers?


Linking up at:


Tuesday, March 4, 2014

Helping My Girls Move Into a New Apartment & Why I Love Firestone!

I love, love, love helping my girls fix up their new apartments when they move!  My daughter met her roommate as first year students in college...and they have since been friends.  So let's count how many apartments I've helped them plan and decorate:  2nd year, 3-4th year, first apartment out of college, second apartment out of college, third apartment out of college and their most recent apartment as of last weekend.  Six times of working on floor grids for room planning, purchasing thrift store finds, painting pieces to make them pretty, loading trucks, unloading trucks, unpacking boxes, hanging pictures, etc.  I do love it, but this last move may be my last time of being so involved....IT'S HARD WORK!  Especially when they live in tiny apartments in NYC that cost a fortune to rent, and every inch of space counts!  It's a fun challenge, but I think I'm done!  :)

The beginning of the process is the same....send me pictures of the apartment, and I'll do a floor grid layout.  That way we can figure out what they might need, and what they may need to let go.  

Then the fun begins:  The Pinterest Board of sharing ideas.  We post ideas there and then the shopping begins.

Bailey loved a gray and white geometric for her new shams and duvet.  I found this from CraneandCanopy.com:


They did a beautiful job on her order...and I loved the way it arrived...packaged so beautifully, with a small packet of lilac, adding a beautiful fragrance to the bedding.


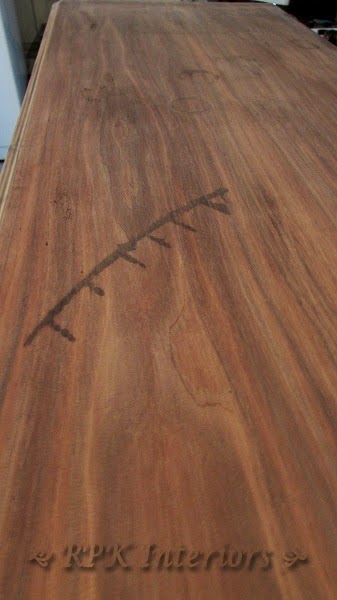
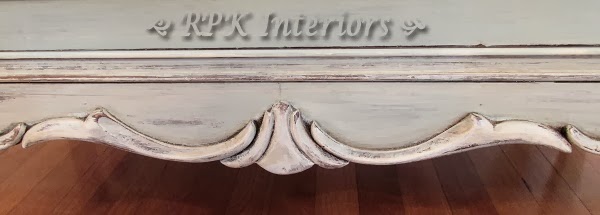
She also needed a small chair that didn't take up much floor space.  I had this in my 'inventory':


Here it is painted, and new fabric:


I had this fabric leftover from a project from awhile back.  The gray and white look lovely with the fabric from her duvet and shams.

I also found some great pillows at Homegoods that complemented the gray, but they didn't make it up to NYC.  


She has one brick wall in her room (which is a look I personally like) and the other walls look like Linen White from Benjamin Moore...a beautifully creamy white.  I wanted to add something to the windows, but I didn't have a lot of time to sew something.  After snooping around on Pinterest, I found roller blinds with fabric:


After reading the directions, I thought, why not just stencil a vinyl blind?  So that's what I did with ASCP a mixture of ASCP French Linen and Paris Gray.


My daughter's room had no room for a night stand...and you know having your cell phone near you at all times is of utmost importance, right?  I saw this cute idea:


This black leather with white stitching file holder would work perfectly next to her bed:


A pretty black lamp with cute shade, round mirror from Hancock Fabrics and 3 tiered table for Bailey's night stand finished up the shopping...


Of course before we load up the car, I have to stage all the goodies!


We load up the car to make the journey from Southeast Virginia to The Big Apple:


Not the tidiest packing job, but we got it all in!  We picked up 3 wardrobe boxes which were really annoying to stuff in the car...They are heavy boxes!

In the meantime, the girls were busy packing:


I was hysterically laughing when I saw how my daughter labelled the boxes!  Isn't she so cute?

And now the not so fun part of this story - We got a flat tire on the New Jersey Turnpike!  I've seen bloggers have the presence of mind snapping pictures in the midst of crisis.  When we unloaded the car, and all of those beautiful pieces were sitting on the side of the New Jersey Tnpk, and cars were flying by us at 70-80mph, taking photos was not foremost on my mind!

Here she is with her "donut" on:


We hobbled down the turnpike for about 10 miles, and then a few more miles to the Firestone Station:


While we were still on the turnpike, we called ahead and the Firestone Representative talked me off the ledge!  I haven't been this scared in quite awhile....But he was great!  Thanks, Brian!


The girls had packed up most everything....We helped with a few, last minute things.  Their place is small, so we used the height of the apartment to stack boxes!  And there were boxes, upon boxes, upon boxes!  How did they accumulate so much 'stuff' at such a young age?????


The poor movers!  They lived in a 3rd floor walk up and moved to a 4th floor walk up!  But if you live in the NYC area and are in need of movers, I highly recommend this fellow.  He and his staff we responsive, prompt and some of the nicest people I've met in a long time.

Here is an "after" picture (poorly photographed, but geez, I was 9 hours into this project when it occurred to me take a photo!) of boxes stacked in their new, tiny kitchen:


These are the only pictures I took of anything completed!  


The roller blind makes a nice valance, don't you think?

Bailey's bed with her new linens...against the brick wall!  Very NYC chic!


There are so many smart ideas out there in Pinterest World.  It's fun finding an idea and turning it into something useful for yourself!

I love the planning and shopping for a move....but I think I'm going to let the girls have the pleasure of packing, unpacking, setting up and accessorizing, from here on out!  :)

Thanks for stopping by!

Robin